


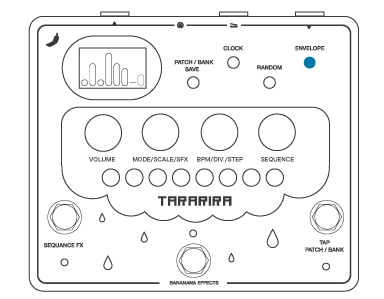
This is the main switch that switches between active and bypass.
Pressing the switch only short time toggles between ACTIVE and BYPASS (alternate switching).
By pressing it longer toggles between ACTIVE while held down, and BYPASS when released (momentary switching).
With this function, you can control it easily with a minimum number of presses when switching frequently, such as applying an effect to a part of a phrase.
Toggles the assigned sequence effect on and off.
Tapping the footswitch multiple times in quarter notes to match the tempo will instantly change the BPM of the sequence.

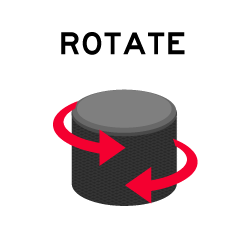
PUSH - Switch pages
ROTATE - Change parameters

Allows you to play and input sequence data by touch.

Power supply
DC 9V (center negative) only
Use an adapter with enough current capacity (200mA or more).
If the adapter is unstable, it may not work properly.
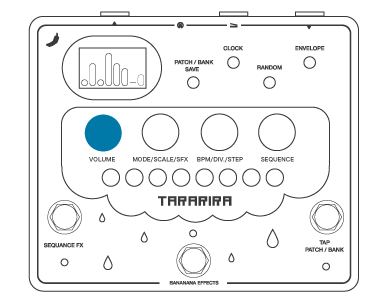
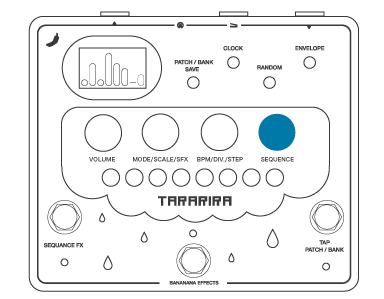
Knobs operation

VOLUME Knob
(MASTER/DRY/WET/OPT)

Adjusts the volume of the master volume.

Adjusts the volume of the clean volume.

Adjusts the volume of the effect sound.

Adjusts the different controls for different modes.
Normal: Filter Organ: 5th Mix
Hold: Root Mix Square: Root Mix
Sine: Oct Mix
MODE/SCALE/SFX Knob


You can select from 8 modes.
Pitch shifter based mode. You can apply a tone filter.
Converts a monophonic input signal to a sine wave and shifts the pitch.
Pitch shifter with additional 5th harmony.
Holding the sounding note when it is turned on and then converting it to a sine wave and shifts the pitch (monophonic).
Temporarily holds the sound that is playing when it is turned on and shift the pitch.
Samples the input signal in a short time and sequences the output with different playback speed and direction.
Converts the input signal into a square wave, allowing you to pitch-shift the sound like a retro game or fuzz.
Switches between 8 mini-effects using a sequencer.

Choose from 27 different scales and 3 user editable scales.
In Glitch or ToyBox mode, scales don't be used.
Major scale.
Same interval as CDEFGABC
Major scale with 7th lowered by a semitone.
Same interval as GABCDEFG
Minor scale with the 6th raised a semitone.
Same interval as DEFGABCD
Minor scale.
Same interval as ABCDEFGA
Minor scale with the 2nd lowered a semitone.
Same interval as EFGABCDE
Minor scale with the 2nd and 5th lowered a semitone.
Same interval as BCDEFGAB
Major scale with the 4th raised a semitone.
Same interval as FGABCDEF
This is the major pentatonic scale. It works for all major keys.
(From bottom to top: Root, 9th, M3rd, 5th, 6th, Root, 9th, M3rd)
This is a minor pentatonic scale. It works for all minor keys.
(From bottom to top: root, m3rd, 4th, 5th, 7th, root, m3rd, 4th)
This scale is composed of M3rd and 5th. Suitable for all major keys. Recommended when a wider range than pentatonic scale is needed.
(From the bottom: Root, M3rd, 5th, Root, M3rd, 5th, Root, M3rd)
This scale is composed of m3rd and 5th. Suitable for all minor keys. Recommended when a wider range than pentatonic scale is needed.
(From the bottom: root, m3rd, 5th, root, m3rd, 5th, root, m3rd)
This scale consists of 4th, 5th and octave. This is a useful scale to use for most phrases.
(From bottom to top: Root, 4th, 5th, Root, 4th, 5th, Root, 4th)
This scale is composed of 5th, 6th and octave. It can be used for almost any phrase and has a floating sound.
(From the bottom: Root, 5th, 6th, Root, 5th, 6th, Root, 5th)
This scale is composed of 5th, 7th and octave. It can be used for almost any phrase and has a bluesy sound.
(From bottom to top: Root, 5th, 7th, Root, 5th, 7th, Root, 5th)
This scale consists of a 5th and an octave. This is the easiest scale to use for all kinds of phrases.
(From bottom to top: Root, 5th, Root, 5th, Root, 5th, Root, 5th)
This scale consists of 4ths, 5ths and 9ths. It is suitable for most phrases and has a floating sound.
(From bottom to top: Root, 9th, 4th, 5th, Root, 9th, 4th, 5th)
Editing User Scales
TARARIRA has 3 user scales that allow you to edit the scale as you like.

Pressing and holding down the SCALE knob while the USER 1-3 scale is displayed will switch to scale edit mode.

Turn the SCALE knob to select the step you want to change, and press it.

Select the pitch you want to assign to the step by pressing the knob.
You can select from two octaves down to 5th of an upper octave.
Press and hold the knob again to exit the edit mode.

Select the effects assigned to the SEQUENCE FX switch.
Doubles the speed of the sequencer.
Stops the sequencer's progress at the last step.
Reverses the sequencer's direction.
The sequence proceeds by skipping the next step.
Pauses the progress of the sequencer at the current step.
Progresses through the sequence alternating between constant speed and double speed.
Immediately jumps to the start position of the sequencer.
Stops the sequence at the current step and leaves it sounding regardless of the envelope.
Randomizes the sequence only when the Sequence Fx switch is held down.
BPM/DIV/SKIP Knob


Adjusts the BPM of the sequence from 60 to 400.

Selects which note division to use for the tempo of the sequence.


Sets the number of steps in the sequence from 1 to 8.
Editing a Sequence
(SEQUENCE Knob)

Rotate the SEQUENCE knob to display the cursor.
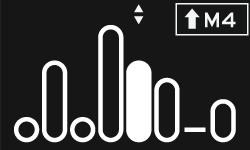
Move the cursor to the step you want to edit and press the knob to enter edit mode for the selected step, and the current pitch information will be displayed.

You can change the pitch by rotating the knob.
Press the knob to apply the setting.
The pitch is based on the set scale.

Each time the RANDOM button is pressed while editing a sequence, a sequence pattern is randomly generated and overwritten.

Press and hold the knob to enter the scroll mode. The sequence pattern can be scrolled back and forth by rotating the knob.
Save Presets
You can save up to 9 of your favorite presets in 3 banks and 3 patches.


Press and hold the SAVE button.

Use the footswitches to enter the BANK and PATCH of the save destination. Press the SAVE button again to cancel.


The current settings have been saved to the specified location.
Load presets
Press the PATCH /BANK button to enter the standby mode for selecting the PATCH to load.
Pressing the button again enters the standby mode for selecting BANK.
Press the button again to cancel loading and return to the sequence view.


Use the footswitch to enter the PATCH or BANK to load.
If you want to load BANK, you need to select PATCH as well.

The selected preset has been loaded.
Quick Change
This function allows you to seamlessly switch between presets with just a footswitch while playing.


If you release the TAP switch before the gauge reaches zero, the PATCH selection view will appear.

Select the task you want to switch at the timing you release the TAP switch.

Clock source settings


Each time the button is pressed, the clock sources are switched.
Uses the internal clock of the pedal.
If you switch to other sources, the BPM setting will be disabled.
Synchronizes with the clock signal from an external MIDI device such as a DAW.
For accurate synchronization, the master side should output only the clock signal.
The sequence can be controlled by note signals from an external MIDI device.
MIDI NOTE C0-C1 corresponds to pitch 1-8 respectively.
When an expression pedal is connected, it can be used as a pitch shifter to change the pitch by step.
The TOUCH KEY can be used to control sequences like a keyboard.
Random function

Each time you press the button, it toggles between sequential and random.
The sequence proceeds sequentially.
The sequence will be played back randomly.
The same step will not be played continuously.
Envelope settings

Each time you press the button, the envelope changes and you can choose from four types.

TOUCH KEY
Each "●" has a capacitance sensor inside, and you can input the corresponding control by touching it.
If the touch keys are touched when the power is turned on, accurate calibration cannot be performed.
Do not touch the touch keys when the power is turned on.
If the unit starts up with them touched and does not operate correctly, please turn the power again.
Diagnostic Mode
The pedal is equipped with a mode that allows you to internally check if the controls and inputs/outputs are working properly.
The data for the diagnostic mode is written and the unit enters the diagnostic mode.
Do not unplug the power supply at this time.
Before entering the diagnostic mode, be sure to unplug all plugs.

After confirming that all controls are checked and working properly, it will automatically move to the internal signal check view.

In this view, you can check if the audio input/output, expression input, clean signal, wet signal, three DSP control signals, and MIDI input are working properly.
Compare the waveforms of INPUT and EXP at the top of the display.
If they are working properly, the same waveform will be displayed.
Compare the DSP waveforms on the right side of the screen with those corresponding to POT 0-2 on the left side of the middle row of the screen.
If it is working properly, the amplitude of the DSP will increase or decrease in accordance with the movement of the POT.
Compare the Clean and Wet waveforms on the left side of the lower part of the screen with the OUTPUT waveform on the right side.
Check if the amplitude of the OUTPUT becomes larger or smaller in response to the movement of Clean and Wet.
Connect a MIDI cable and send one of any MIDI NOTE from the master side.
If MIDI data is received correctly, ”X” will appear in the box at the bottom left of the screen.
The next time the power is turned on after diagnostic mode, the unit will perform an internal initialization operation to return to normal mode before starting up. At this time, never disconnect the power plug.
(User preset and user scale will not be initialized)
Factory Reset
All settings can be reset to the factory defaults.
When the power is turned on while holding down PATCH/BANK, the factory reset selection menu appears.
You can execute the reset with the left footswitch and cancel it with the right switch.
At this time, never disconnect the power plug.
Troubleshooting
It won't turn on.
Try a different AC adapter.
An AC adapter with unstable voltage may not start up.
The sequence does not proceed / the TAP TEMPO LED does not light up
Is the clock setting set to INTERNAL or MIDI CLOCK?
If MIDI CLOCK is selected, is a clock signal being output from the master?
The touch panel does not respond properly.
Did something touch the touch panel at startup?
Make sure that nothing touches the touch panel, and reboot.
MIDI CLOCK is not synchronized correctly.
Is a MIDI signal other than MIDI CLOCK being output from an external device?
Set the external device to output only the CLOCK signal.
When editing a sequence, a different pitch is entered than expected.
The unit is designed to allow quick input using the touch keys.
Turn the knob without touching the touch keys, or use the touch keys to input.
MIDI NOTE does not respond during KEYBOARD operation.
Is the MIDI NOTE output in the range of C0-C1?
The pitch of SIZE/SINE HOLD is not pronounced correctly.
Only in these two modes, the input signal have to be monophonic (single note) .
Please play monophonic notes instead of chords.
OLED is dark/not lit
In order to avoid OLED burnout, TARARIRA reduces OLED brightness after 5 minutes of inactivity and turns off after 20 minutes.
It will turn on again when there is control input again.
Also, burn-in is a phenomenon that occurs due to the characteristics of OLED displays and is not eligible for replacement, return, or refund.
The SEQ FX does not turn ON.
Is Retrigger or Mmnt Random selected for SEQ FX?
These modes are turned on only when the SEQ FX switch is pressed.
Updating the firmware
TARARIRA can be connected to a computer via USB to update its firmware.
The update is done using WebUSB, which communicates with the hardware directly from a web browser.
Please visit the following page using the latest version of Google Chrome browser, which supports WebUSB.